
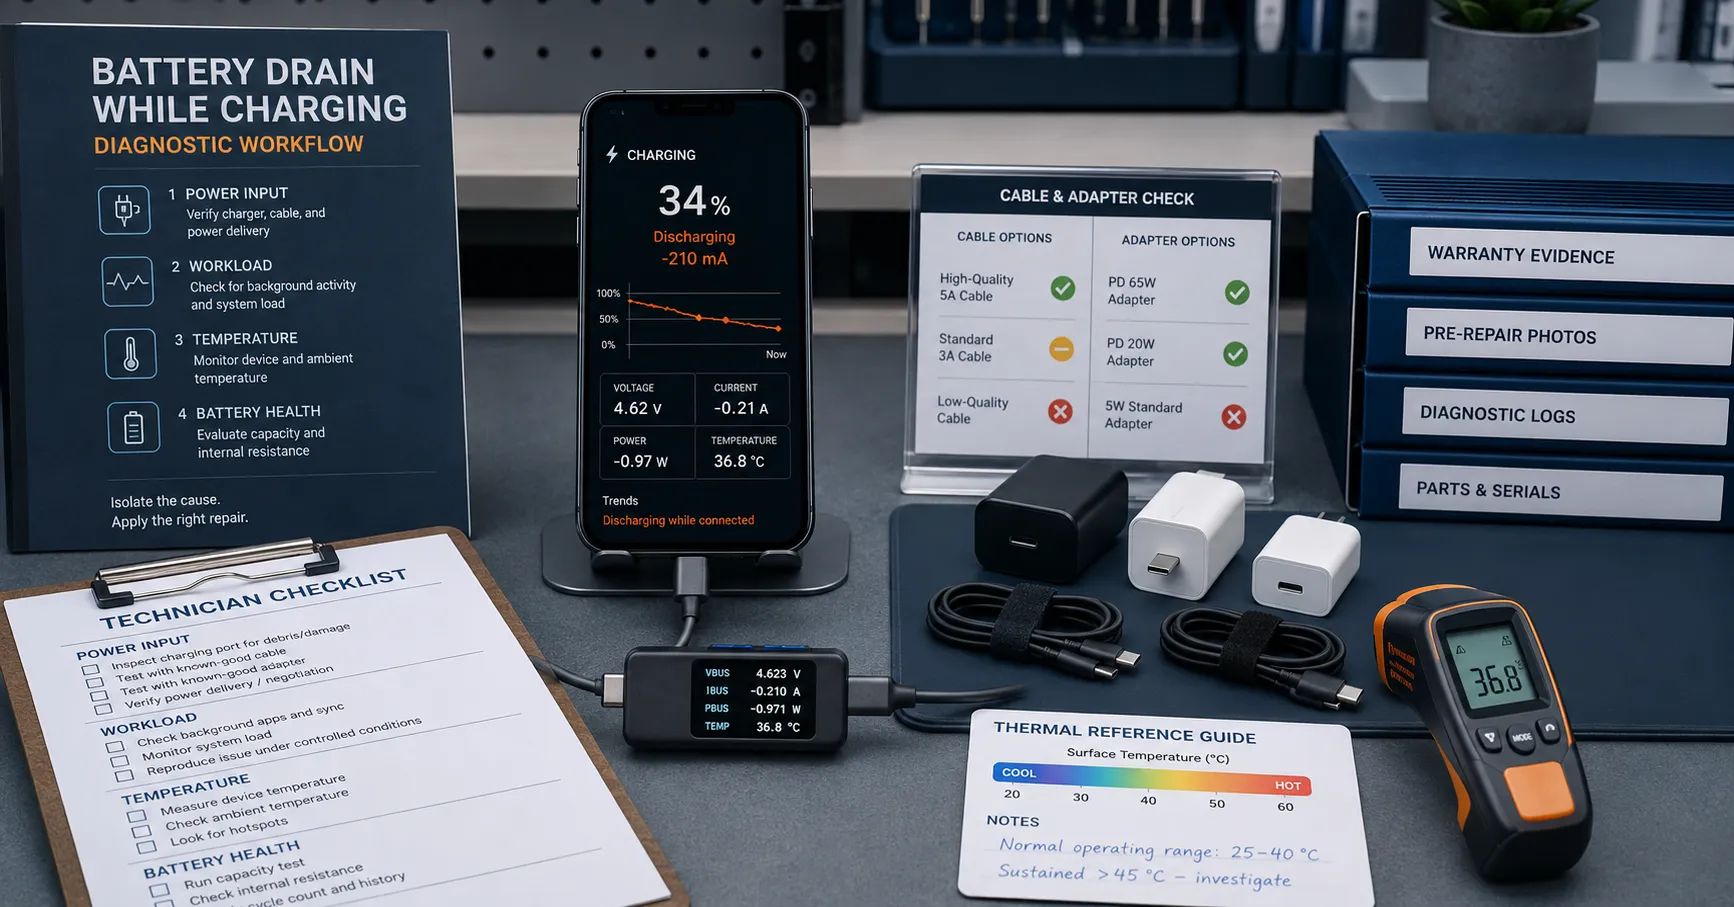
When an iPhone battery drains while charging, the immediate conclusion should not be “the replacement battery is defective.” Battery percentage falls whenever usable charging power reaching the phone is lower than the phone’s current demand, or when charging is paused or limited. A defective battery can contribute, but so can a weak adapter, damaged cable, contaminated port, shared power source, intensive workload, temperature control, installation issue, charging circuit fault or misleading test condition.
For repair chains and warranty teams, the correct response is a controlled reproduction test. Confirm the complaint, record the charging state, change one variable at a time, compare the suspect battery and device with known-good references, and preserve model and lot evidence. This prevents a battery supplier claim from being approved solely because the screen showed a charging icon while the percentage continued to fall.
Understand the Net-Power Principle
External power does not guarantee that the battery is gaining energy. The practical relationship is:
Net battery direction = usable power delivered to the device − power consumed by the active device.
If usable input exceeds demand, the battery can charge. If the values are close, the percentage may rise very slowly or remain almost unchanged. If demand exceeds usable input, the battery may continue to discharge even though the device recognizes a connected charger. This principle explains why the same phone may charge while locked but decline during gaming, navigation, camera use, hotspot operation or another sustained workload.
Do not infer exact power from a charging symbol. The symbol indicates a detected charging state, not the amount of power that reaches the battery after conversion losses, system consumption and charging controls. Use approved measurement tools and repeatable conditions when electrical evidence is required.
Define the Complaint Before Opening the Phone
Warranty intake should convert “it drains while charging” into a testable statement. Record the exact iPhone model, software version, battery SKU, battery revision, lot, installation date, charger, cable, connection method, starting percentage, observed percentage change, test duration, running applications, display state, network condition, ambient environment and any temperature or charging messages.
Ask whether the symptom occurs only under a heavy task, at idle, during wired charging, during wireless charging, with one accessory, or with every verified source. Note whether the phone restarts, heats unexpectedly, disconnects and reconnects, shows an accessory warning, pauses at a charge limit or loses percentage only near full charge. Each pattern leads to a different branch.
Photographs or screen recordings can support timing and messages, but they do not replace controlled reproduction. Customer-supplied evidence should be preserved as complaint evidence and kept separate from the repair team’s test record.
Screen for Safety Before Testing
Stop routine testing if the device or battery shows swelling, pouch damage, unusual odor, liquid exposure, severe localized heating, damaged insulation, a deformed connector or another condition covered by the organization’s safety-isolation procedure. Do not compress, puncture or continue charging a suspect lithium-ion pouch to reproduce a complaint.
Use trained personnel, approved tools and the repair business’s electrical and battery-handling procedures. The goal of this SOP is fault isolation, not instructions for live board repair. Board-level measurement and component work should be performed only by qualified technicians using the applicable service process.
Use a Controlled Diagnostic Matrix
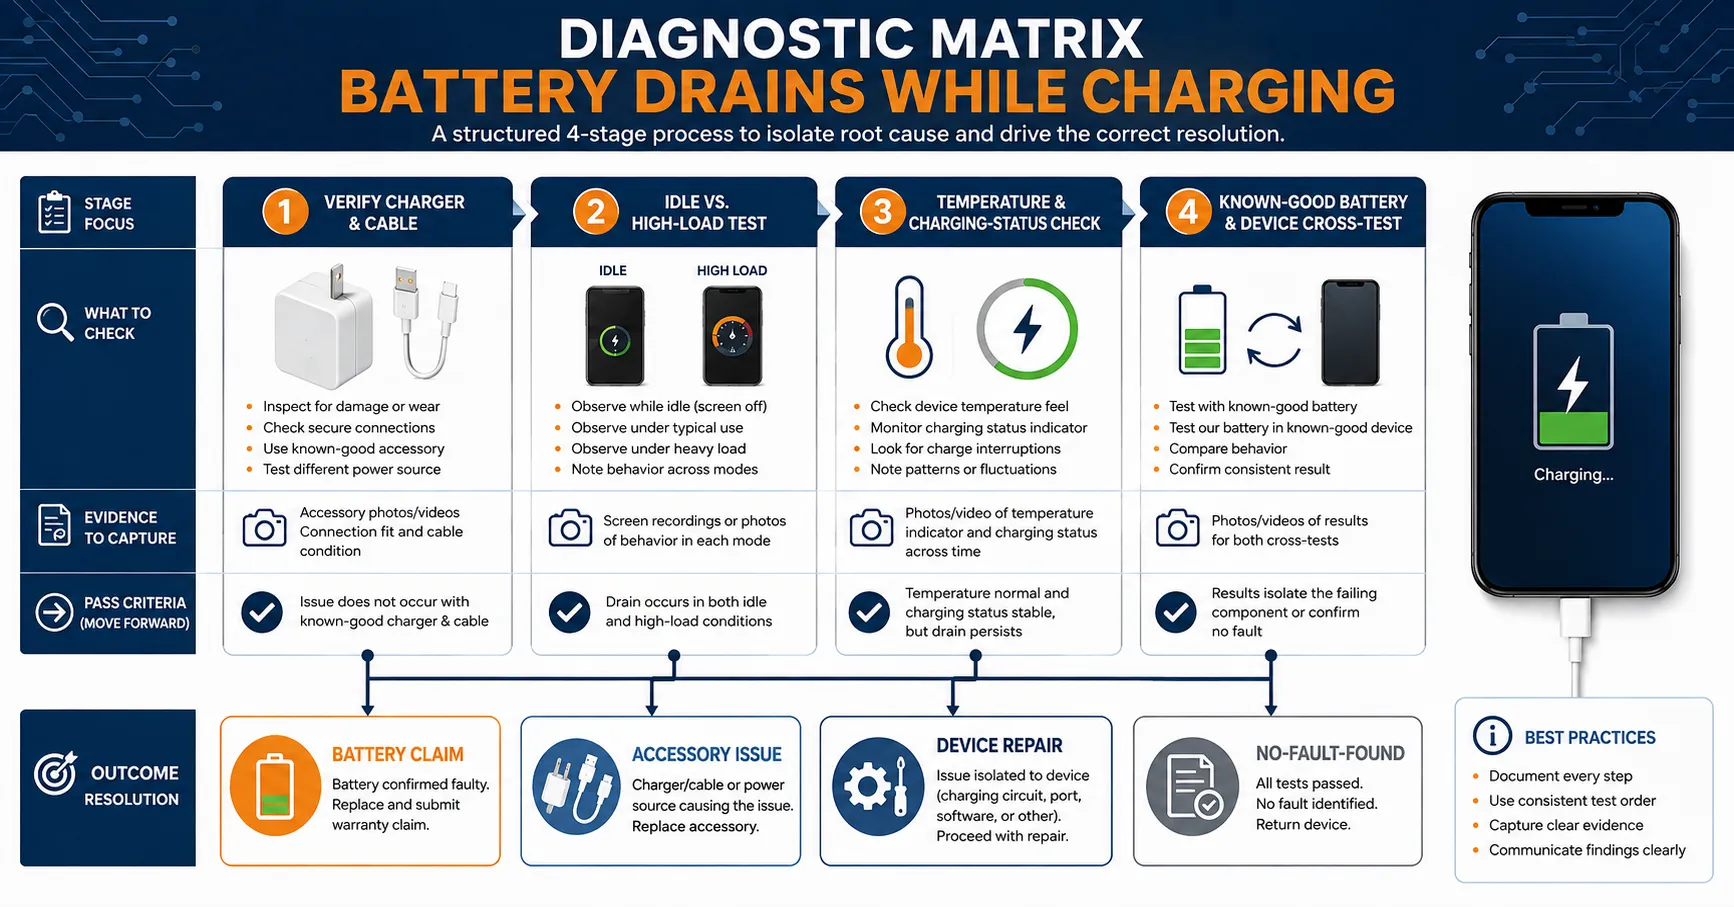
| Test stage | Controlled change | Evidence to capture | Likely direction |
|---|---|---|---|
| Power source | Known-good compatible adapter, cable and wall source | Accessory identity, connection stability, charging status and percentage trend | Accessory, port or supply branch |
| Workload | Locked idle versus defined active task | Task, brightness, radios, duration, temperature and percentage trend | Input-versus-load balance |
| Temperature and controls | Normal controlled environment after device stabilizes | Charging On Hold, Slow Charger, charge-limit or temperature observations | Expected control or thermal branch |
| Battery/device cross-test | Approved known-good references where safe and compatible | Device, battery SKU, lot, revision and repeated result | Battery, installation or host-device branch |
| Lot review | Comparable units and devices | Failure count, denominator, conditions and common signature | Individual case or batch escalation |
The order matters. If the team changes the charger, cable, workload, temperature and battery at once, a passing result cannot identify which change solved the problem. Use the same starting range and test duration where practical, and document unavoidable differences.
Step 1: Verify the Power Source and Connection
Begin with a known-good, compatible power source and cable approved by the repair business. Connect directly rather than through an unverified hub, vehicle port or pass-through accessory. Inspect for damaged cable ends, unstable connection and port contamination using an approved method.
Apple’s current iPhone charging troubleshooting guidance directs users to inspect the cable and adapter, check firm connections, remove debris from the port and try another cable or charger. These are useful first controls, but a warranty lab should also record exactly which reference accessories were used.
Apple also notes in its iPhone charge-speed guidance that computer, hub, vehicle and multi-port sources can provide slower or reduced output depending on conditions and connected loads. Therefore, a phone loses battery while plugged in complaint reproduced only on one shared source does not yet isolate the battery.
Step 2: Separate Idle Charging From Charging Under Load
Stabilize the device, record the starting state and run a defined idle test with the display locked. Then repeat under the customer-relevant workload without altering other inputs. Record duration, display brightness, network, task, accessories, temperature observation and percentage change.
A phone that gains charge at idle but declines only during a sustained intensive task may be experiencing a power-balance limitation rather than a standalone battery failure. Apple states that processor- or graphics-intensive applications, camera use and high-quality video at high brightness can reduce charging speed. The warranty decision must still consider whether the verified power source is appropriate and whether the behavior differs materially from a known-good reference under the same conditions.
If percentage declines at idle with a stable verified source, the investigation should move toward connection, charging path, abnormal device consumption, battery behavior or measurement error. Do not continue increasing workload to force a more dramatic result.
Step 3: Record Temperature and Charging Controls
Charging can slow or pause because of temperature. Apple’s Charging On Hold guidance explains that charging may be put on hold when the device becomes too hot or too cold and resumes when the temperature returns to normal. Record the actual message and environment instead of describing every pause as a battery defect.
Also distinguish a charge limit or optimized-charging behavior from unintended discharge. Depending on model and software, the phone may intentionally stop near a configured limit or delay charging. A small percentage movement around a limit is not the same complaint as continuing decline at a low state of charge under a verified idle test.
Do not defeat automatic temperature protections for diagnosis. Allow the phone to return to a normal test condition, document the recovery period and repeat the same controlled stage. If excessive heating persists in comparable conditions, route the case for qualified hardware diagnosis.
Step 4: Inspect Installation and Battery Identity
Confirm the installed battery matches the exact device model and the approved buyer record. Inspect accessible evidence for connector seating, flex routing, insulation, adhesive placement, pinching, contamination and signs of damage. Do not reopen a device merely to satisfy a checklist when safety or customer authorization requires another process.
Compatibility must be confirmed by device model and battery specification. Capacity claims require verification for the specific battery and test method. A battery-health screen, percentage display or favorable system message does not independently prove electrical performance, product origin or correct installation.
Use the published mobile phone battery incoming-inspection guide to connect packaging, visual, identity and electrical acceptance records to the installed unit. Lot and revision traceability are essential when a single complaint later becomes a repeated pattern.
Step 5: Run a Replacement Battery Charging Test
A replacement battery charging test should define the device, starting state, source, cable, environment, software, idle or active workload, duration, measurements and acceptance criteria before the test begins. The procedure should be validated by the repair organization and appropriate for the exact device and equipment.
Observe connection stability, charging status, percentage trend, unexpected restart or shutdown and temperature behavior. Where the organization uses approved electrical instrumentation, record the method and its limitations. Do not publish a current, capacity or thermal threshold as universal unless it has been approved for that model and test configuration.
Repeat enough times to distinguish a persistent signature from one unstable connection or transient software task. If the result changes after rebooting or allowing background activity to settle, preserve that observation; do not rewrite the first result as if it never occurred.
Step 6: Use Known-Good Cross-Testing Carefully
When authorized and safe, compare the suspect battery in a documented known-good compatible device and compare an approved known-good battery in the suspect device. Keep the charger, cable, workload and environment constant. This two-direction test is stronger than replacing the battery once and declaring the removed unit defective.
- If the symptom follows the suspect battery across known-good devices, battery or battery-interface investigation becomes stronger.
- If different approved batteries show the symptom only in one device, examine the host device, port, charging path, abnormal load or installation environment.
- If the symptom disappears with a verified adapter or cable, route the case to the accessory or input-power branch.
- If the symptom appears only under one high-load task, document the input-versus-demand condition and compare with a known-good baseline.
- If results are inconsistent, keep the case open for controlled repetition rather than forcing a warranty decision.
The broader post-replacement fast-drain diagnostic guide supports cases that also show rapid standby or normal-use discharge. This SOP remains focused on the narrower condition while power is connected.
Step 7: Separate Battery, Accessory, Device and Expected-Control Outcomes
| Evidence pattern | Provisional disposition | Required next action |
|---|---|---|
| Symptom follows battery in controlled cross-tests | Battery-related claim candidate | Quarantine unit, preserve lot evidence and review comparable stock |
| Symptom stays with one device across approved batteries | Host-device diagnosis | Route port, charging circuit, board load or other device investigation |
| Symptom occurs only with one cable, adapter or shared source | Input/accessory issue | Document failed source and avoid charging the battery claim |
| Charging pauses with documented temperature message | Temperature-control condition | Stabilize safely and retest; investigate abnormal recurrent heat |
| Decline occurs only under defined heavy load | Power-balance result | Compare against verified input and known-good device baseline |
| Complaint cannot be reproduced | No fault found, not automatic rejection | Preserve conditions, request missing evidence and define retest route |
These are provisional routes, not automatic verdicts. A warranty team should use approved acceptance criteria and the commercial agreement. Avoid labeling a customer report “misuse” without evidence, and avoid charging a supplier for a device or accessory problem.
Build an iPhone Battery Warranty Diagnosis Record
An iPhone battery warranty diagnosis record should allow another technician to reproduce the decision. Include:
- case ID, customer channel and intake date;
- exact device model and identifying code allowed by policy;
- software version and relevant charging settings;
- battery SKU, revision, lot and installation date;
- charger, cable, source and connection method;
- starting percentage, duration, ending percentage and workload;
- temperature or charging messages and connection interruptions;
- visual, installation and safety observations;
- known-good references and cross-test results;
- provisional root-cause category, disposition and approver.
The mobile phone battery warranty-claims guide can support consistent evidence intake, symptom coding and resolution. Warranty terms depend on the specific product and agreement, so the SOP must not invent a universal replacement or refund rule.
Escalate From One Case to a Batch Investigation
One failed unit does not prove a lot-wide problem. Escalate when multiple comparable cases share the same battery code, revision, lot, device, condition and signature, or when the severity justifies immediate containment. Define the denominator: three reports from ten installed units carries different operational meaning from three reports across thousands, but no universal trigger should be published without an approved quality plan.
Place suspect stock on an appropriate hold, preserve returned units, review incoming and installation records, and use a documented battery sampling plan for additional evaluation. Keep sample selection, device mix and acceptance criteria visible. Do not release held stock because one convenient sample passes.
Supplier communication should contain the failure signature, conditions, affected models, lot evidence, test method and requested action. Avoid sending only “battery drains during charging,” which is too broad for corrective analysis.
Track Repair and Warranty Performance
Use symptom codes that separate connected-state discharge from standby drain, short runtime, charging interruption, slow charging, heating and percentage jump. Track no-fault-found cases, accessory causes, device causes, installation causes and battery-confirmed cases separately.
Useful operational measures include reproduction rate, diagnostic time, repeat-return rate, confirmed battery-claim rate, claim cost and time to containment. Segment by model, battery lot, revision, branch and technician group. Metrics should improve the process, not encourage technicians to reject difficult claims prematurely.
Frequently Asked Questions
Does a charging icon prove that the battery is charging?
No. It shows that the phone detects a charging condition. It does not prove that usable input exceeds current device demand or that the battery is gaining energy.
Why can an iPhone charge when locked but drain during use?
The active workload may consume more power while the usable charging input remains limited. Compare idle and defined-load behavior using the same verified source and environment.
Does Charging On Hold mean the replacement battery is defective?
Not by itself. Record the temperature-related message, stabilize the device under an approved condition and repeat the test. Persistent abnormal heating requires qualified investigation.
When should a battery warranty claim be approved?
Follow the buyer’s approved criteria and commercial agreement. Strong evidence includes a repeatable symptom that follows the battery across controlled compatible cross-tests while accessory, workload and host-device causes are reasonably excluded.
What if the complaint cannot be reproduced?
Record “no fault found” with the actual conditions, not “customer error.” Request missing charger, workload, timing or message evidence and define a consistent retest or monitoring path.
Turn a Charging Complaint Into Reproducible Evidence
A professional iPhone charging battery diagnosis starts with the power source and workload before it assigns blame to the replacement battery. The team should document the complaint, screen for safety, control the source, compare idle and active conditions, capture temperature and charging controls, inspect identity and installation, and cross-test with approved references.
When an iPhone battery drains while charging under a verified idle condition and the result follows the battery across compatible known-good devices, the evidence supports a battery-related escalation. When the symptom stays with the device, accessory, thermal state or workload, route the case accordingly. This evidence-first approach reduces unnecessary replacements while protecting valid customer and supplier claims.
For an ESCCharge battery evaluation discussion, provide the exact iPhone models, battery SKU and lot, complaint conditions, charger and cable, software version, sample quantity and required test record. Compatibility, capacity, availability, MOQ, lead time, certification documents and warranty must be confirmed for the actual battery, target market and agreement.
External Source References
- Apple Support — If your iPhone or iPod touch won’t charge — updated 2025
- Apple Support — About iPhone charge speeds — updated 2026
- Apple Support — If a Charging On Hold notification appears on your iPhone or iPad — updated 2025